On this page
- What is GitHub Pages — and is it right for you?
- What you'll need
- Part 1 — Prepare your project
- 1.1 Make sure your build outputs static files
- 1.2 Add a CNAME file (for custom domains)
- 1.3 Handle client-side routing (SPAs)
- 1.4 Set your site URL for SEO
- Part 2 — Set up GitHub Pages
- 2.1 Push your code to GitHub
- 2.2 Enable GitHub Pages (GitHub Actions source)
- 2.3 Add the deploy workflow
- 2.4 Add secrets for build-time variables
- 2.5 Deploy with a version tag
- 2.6 Set the custom domain in GitHub
- Part 3 — Buy a domain (from anywhere)
- Part 4 — Set up ArvanCloud CDN (free)
- 4.1 Create an ArvanCloud account
- 4.2 Add your domain
- 4.3 Configure DNS records
- 4.4 Change nameservers at your registrar
- 4.5 Enable free SSL
- Part 5 — Connect everything
- Checklist
- Part 6 — The release pipeline
- Useful commands
- Troubleshooting
- "DNS check unsuccessful" in GitHub Pages
- Site loads but shows a blank page
- HTTPS certificate errors
- Old version still showing
- Deep links return 404
- What about the cost?
- Summary
Deploy a Static Site for Free: GitHub Pages, Your Own Domain, and ArvanCloud CDN
A friendly step-by-step guide to hosting a React/Vite app on GitHub Pages, pointing a custom domain from any registrar, and speeding it up with ArvanCloud's free CDN and SSL.
You built a web app. Now you want it online — without paying for a server every month.
Good news: if your app is static (HTML, CSS, and JavaScript files), you can host it for free on GitHub Pages, connect a custom domain from almost any registrar, and put ArvanCloud CDN in front for faster loads and free HTTPS. This is exactly how I deploy Bitser, my music player.
This guide walks through the whole stack, screenshot by screenshot.
What is GitHub Pages — and is it right for you?
GitHub Pages is a free hosting service from GitHub. It serves static files from your repository — no Node.js server, no database, no PHP.
That means it works great for:
- React, Vue, or Svelte apps built with Vite or Create React App
- Documentation sites (Docusaurus, VitePress)
- Personal portfolios and landing pages
- Progressive Web Apps (PWAs)
It does not work for:
- Apps that need a backend API running on the same server
- Server-side rendering (unless you pre-render at build time)
- WebSocket servers or long-running processes
If your app talks to external APIs (like Clerk for auth or Audius for music), that's fine — the browser calls those APIs directly. GitHub Pages just serves the files.
The mental model: GitHub Pages is a free file cabinet on the internet. You build your app locally, push the built files, and GitHub serves them.
What you'll need
| Thing | Cost | Notes |
|---|---|---|
| GitHub account | Free | Public repos get free Pages hosting |
| A static site project | — | Vite + React, Next.js static export, etc. |
| A domain name | ~$10/year | Buy from any registrar (Namecheap, GoDaddy, nic.ir, etc.) |
| ArvanCloud account | Free tier | Free DNS + CDN + Let's Encrypt SSL |
Total monthly hosting cost: $0. You only pay for the domain once a year.
Part 1 — Prepare your project
1.1 Make sure your build outputs static files
Most modern front-end tools do this out of the box. For a Vite project:
pnpm buildThis creates a dist/ folder with everything GitHub Pages needs.
1.2 Add a CNAME file (for custom domains)
If you want myapp.example.com instead of username.github.io/repo, create a file at public/CNAME:
myapp.example.comVite copies everything in public/ into dist/ during build, so this file ends up at the root of your deployed site. GitHub reads it and knows which domain to expect.
1.3 Handle client-side routing (SPAs)
Single-page apps use the browser router. When someone visits myapp.example.com/dashboard directly, GitHub Pages looks for a /dashboard folder — which doesn't exist — and returns a 404.
The fix is a public/404.html that redirects back to your app root while preserving the path. Bitser uses the spa-github-pages pattern:
<!-- public/404.html — simplified -->
<script>
  var pathSegmentsToKeep = 0; // 0 = custom domain at root
  var l = window.location;
  l.replace(
    l.protocol +
      "//" +
      l.hostname +
      "/?/" +
      l.pathname.slice(1).replace(/&/g, "~and~") +
      (l.search ? "&" + l.search.slice(1).replace(/&/g, "~and~") : "") +
      l.hash,
  );
</script>
And a small snippet in index.html (before your app loads) that restores the real path from the query string.
1.4 Set your site URL for SEO
If your app generates share links, Open Graph tags, or a sitemap, set the production URL as an environment variable:
VITE_SITE_URL=https://myapp.example.comPart 2 — Set up GitHub Pages
2.1 Push your code to GitHub
Create a repository and push your project:
git init
git add .
git commit -m "Initial commit"
git remote add origin git@github.com:your-username/your-repo.git
git push -u origin main
2.2 Enable GitHub Pages (GitHub Actions source)
- Open your repo on GitHub
- Go to Settings → Pages
- Under Build and deployment, set Source to GitHub Actions
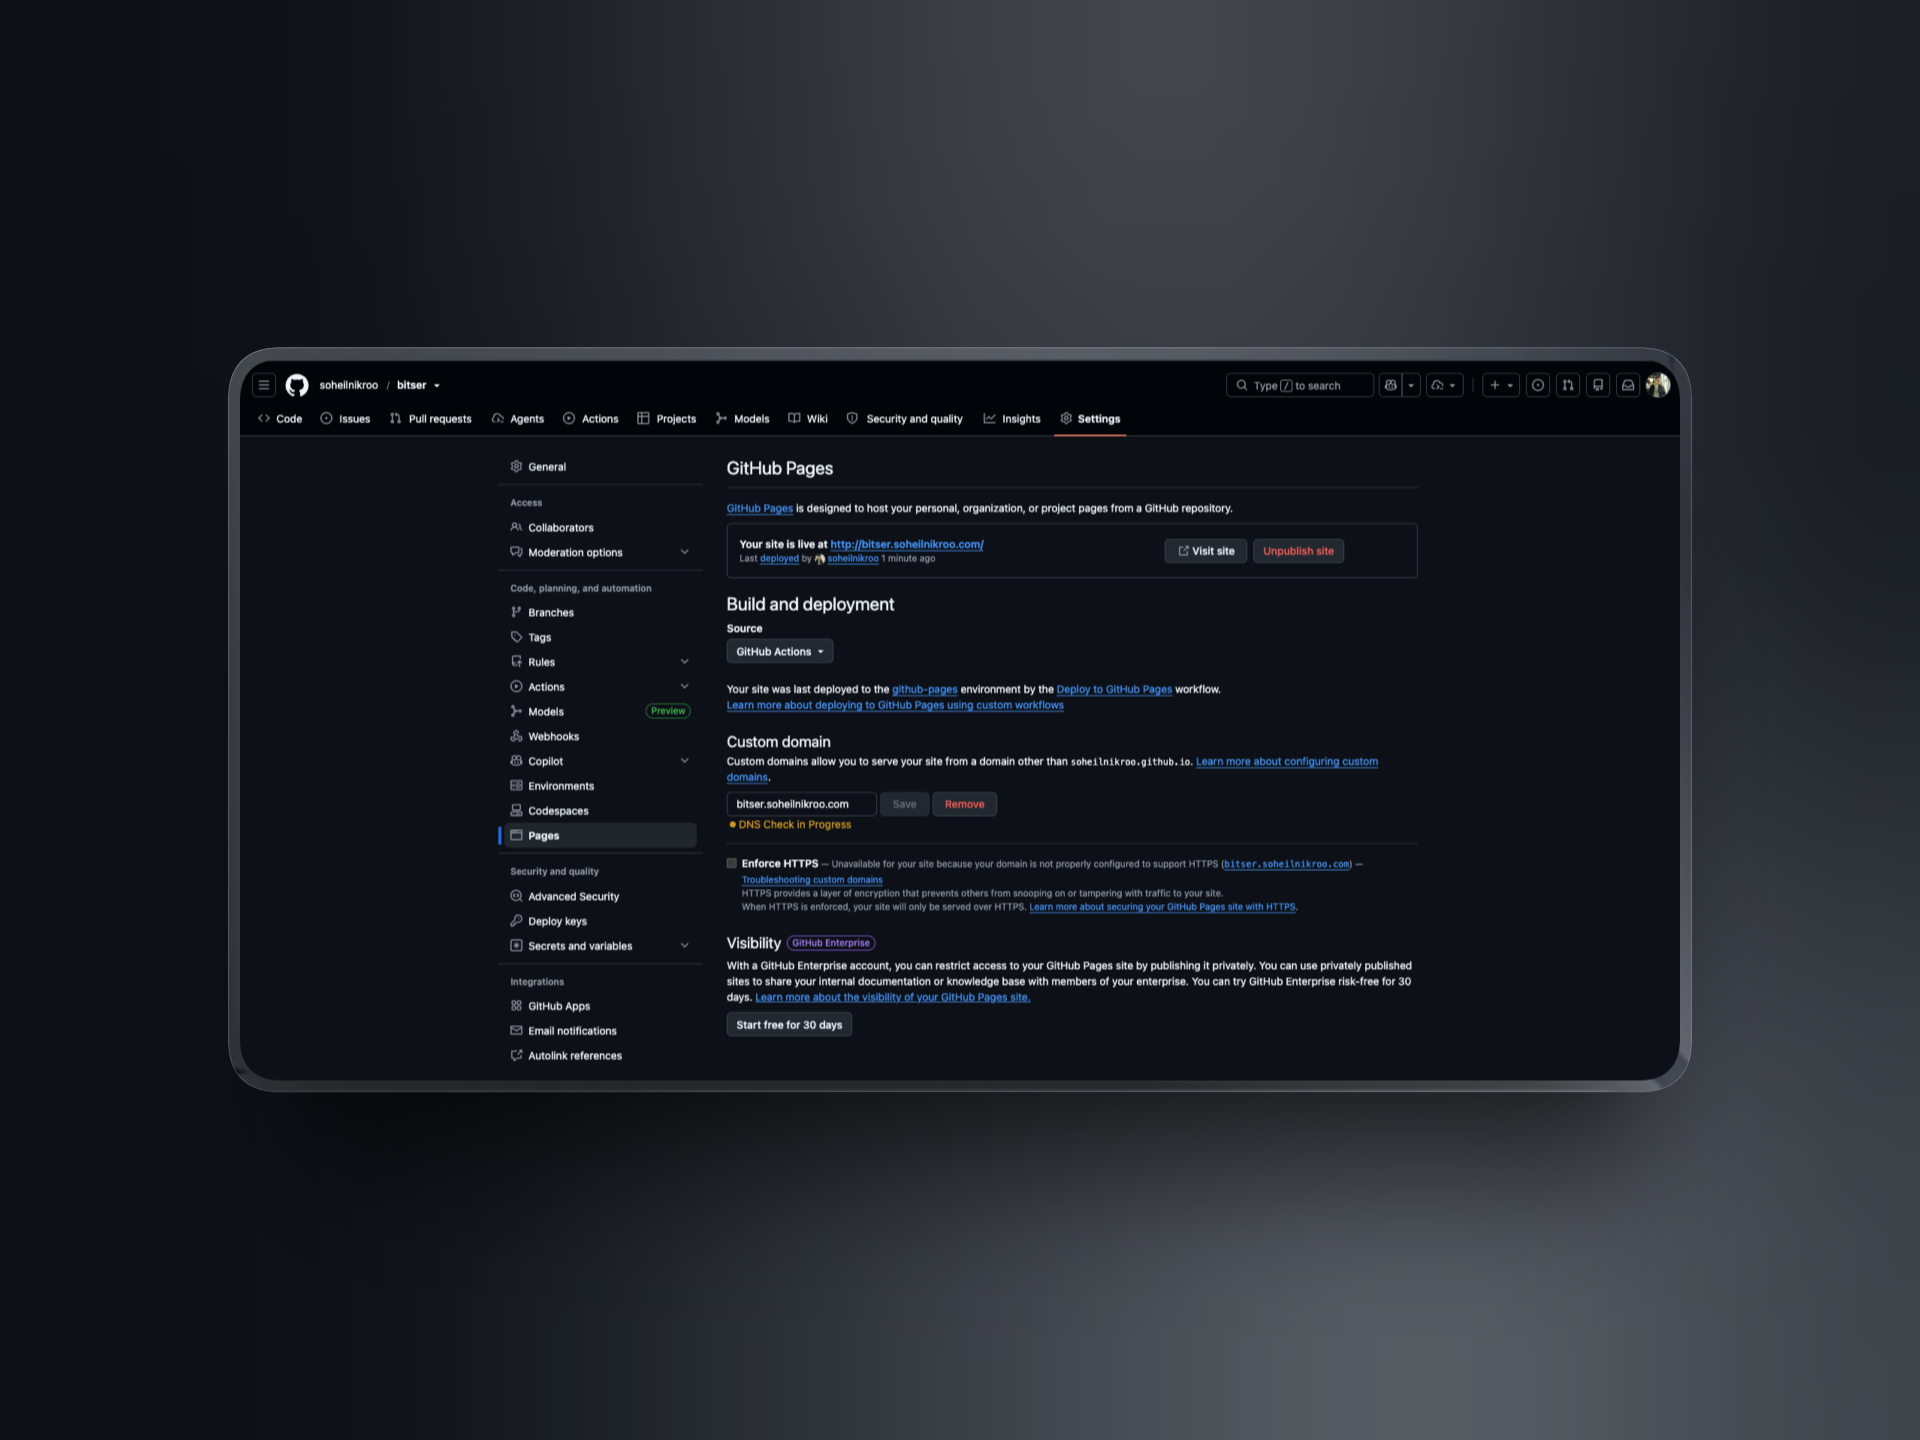
Don't pick "Deploy from a branch" — GitHub Actions gives you a proper CI/CD pipeline with tests before every deploy.
2.3 Add the deploy workflow
Create .github/workflows/deploy-github-pages.yml in your repo. Here's a simplified version of what Bitser uses:
name: Deploy to GitHub Pages

on:
  push:
    tags:
      - "**" # Deploy when you push a version tag
  pull_request:
    branches: [main] # Run tests on every PR

permissions:
  contents: read
  pages: write
  id-token: write

jobs:
  test:
    runs-on: ubuntu-latest
    steps:
      - uses: actions/checkout@v5
      - uses: pnpm/action-setup@v4
        with: { version: 10 }
      - uses: actions/setup-node@v5
        with: { node-version: 22, cache: pnpm }
      - run: pnpm install --frozen-lockfile
      - run: pnpm test

  deploy:
    if: startsWith(github.ref, 'refs/tags/')
    needs: test
    runs-on: ubuntu-latest
    environment:
      name: github-pages
      url: ${{ steps.deployment.outputs.page_url }}
    steps:
      - uses: actions/checkout@v5
      - uses: pnpm/action-setup@v4
        with: { version: 10 }
      - uses: actions/setup-node@v5
        with: { node-version: 22, cache: pnpm }
      - run: pnpm install --frozen-lockfile
      - run: pnpm build
        env:
          VITE_CLERK_PUBLISHABLE_KEY: ${{ secrets.VITE_CLERK_PUBLISHABLE_KEY }}
      - uses: actions/configure-pages@v5
      - uses: actions/upload-pages-artifact@v4
        with: { path: ./dist }
      - id: deployment
        uses: actions/deploy-pages@v4
2.4 Add secrets for build-time variables
If your app needs API keys at build time (like a Clerk publishable key):
- Go to Settings → Secrets and variables → Actions
- Click New repository secret
- Add
VITE_CLERK_PUBLISHABLE_KEY(or whatever your app needs)

Publishable keys are safe to embed in the client bundle — they're designed for that. Never put secret keys here.
2.5 Deploy with a version tag
The workflow deploys when you push a git tag. From your project:
pnpm release:patch # bumps version, runs tests, pushes tagOr manually:
git tag v1.0.0
git push origin v1.0.0
After the workflow finishes, your site is live at https://your-username.github.io/your-repo (or your custom domain once DNS is set up).
2.6 Set the custom domain in GitHub
Back in Settings → Pages:
- Under Custom domain, enter your domain (e.g.
myapp.example.com) - Check Enforce HTTPS once DNS propagates
GitHub will show a green checkmark when DNS is correctly configured.
Part 3 — Buy a domain (from anywhere)
You can buy a domain from any registrar. Popular options:
- International: Namecheap, Cloudflare Registrar, Google Domains
- Iran: nic.ir (
.irdomains), various resellers
The registrar only sells you the name. You don't have to host your site there — you'll point the domain to GitHub Pages through ArvanCloud DNS.
After purchase, you'll get access to a DNS management panel at your registrar. We'll change the nameservers in Part 4.
Part 4 — Set up ArvanCloud CDN (free)
ArvanCloud is an Iranian cloud provider with a generous free tier: free DNS, free CDN, and free Let's Encrypt SSL (including wildcard certificates). It's a great fit if your audience is in Iran or the Middle East, but it works globally too.
4.1 Create an ArvanCloud account
- Go to panel.arvancloud.ir and sign up
- Open the CDN section from the dashboard
- Click Add new domain

4.2 Add your domain
Enter your root domain (e.g. example.com). ArvanCloud will try to import your existing DNS records automatically.
Choose the free plan — it's enough for personal projects and small apps.

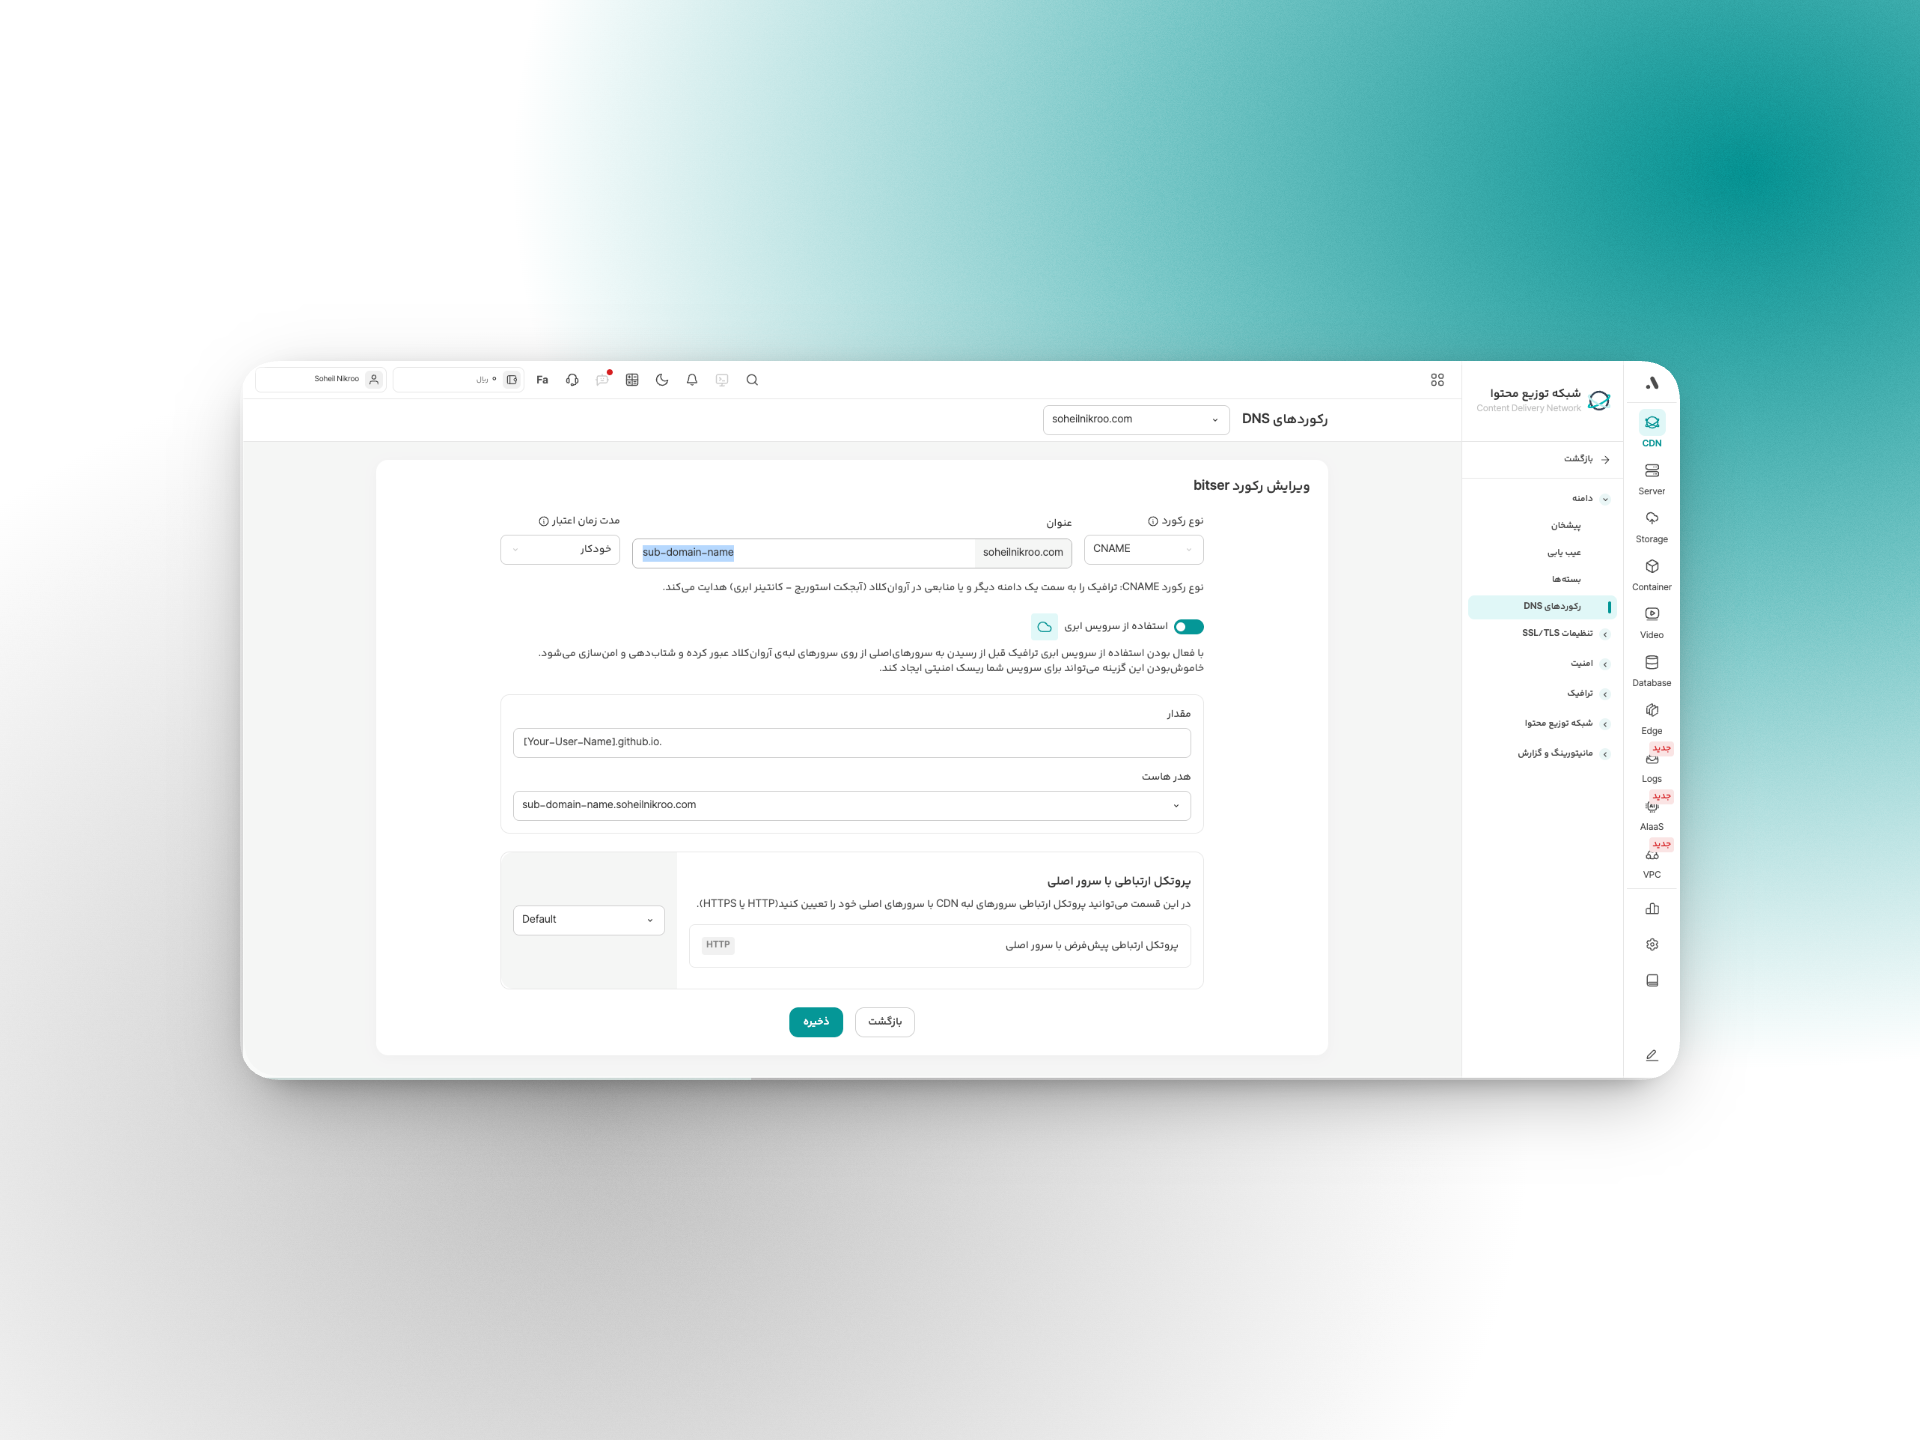
4.3 Configure DNS records
Go to the DNS Records section for your domain. You need a CNAME record for your subdomain pointing to GitHub Pages:
| Type | Name | Value | Cloud (CDN) |
|---|---|---|---|
| CNAME | myapp | your-username.github.io. | ☁️ On |
The trailing dot on the CNAME value is important in some panels. The cloud icon must be enabled — that's what routes traffic through ArvanCloud's CDN.
If you're using the root domain (example.com without a subdomain), use A records instead, pointing to GitHub Pages IPs:
185.199.108.153
185.199.109.153
185.199.110.153
185.199.111.153
4.4 Change nameservers at your registrar
ArvanCloud gives you nameservers like:
ns1.arvancloud.ir
ns2.arvancloud.ir
Copy them from the ArvanCloud DNS page, then go to your domain registrar's panel and replace the default nameservers with ArvanCloud's.


DNS propagation can take anywhere from a few minutes to 48 hours. Usually it's under an hour.
4.5 Enable free SSL
Once DNS is active:
- In ArvanCloud, open your domain → HTTPS Settings
- Turn on HTTPS
- Click Issue Request to get a free Let's Encrypt certificate
ArvanCloud issues wildcard certificates, so *.example.com and example.com are both covered. The certificate auto-renews.

Part 5 — Connect everything
Here's how the pieces fit together:
Visitor
  → myapp.example.com (DNS via ArvanCloud)
    → ArvanCloud CDN edge (caching + SSL termination)
      → GitHub Pages (your built static files)
Checklist
-
public/CNAMEfile contains your custom domain - GitHub Pages → Custom domain set and HTTPS enforced
- ArvanCloud CNAME record points to
your-username.github.io - Cloud icon is enabled on the DNS record
- Nameservers at registrar point to ArvanCloud
- SSL certificate issued in ArvanCloud
- A deploy workflow pushed a tag and succeeded
Visit your domain. If you see your app, you're done.
Part 6 — The release pipeline
Here's the full flow from code change to live site:
1. Write code locally
2. Open a pull request → CI runs tests, lint, typecheck
3. Merge to main
4. Run pnpm release:patch (or push a tag manually)
5. GitHub Actions: test → build → deploy to Pages
6. ArvanCloud CDN caches the new files
7. Users see the update
Bitser's pipeline runs five check jobs on every PR (test, lint, typecheck, build, lighthouse), creates a GitHub Release on tag push, then deploys. You can start simpler — just test + deploy — and add more checks later.
Useful commands
# Local development
pnpm dev

# Production build (test locally)
pnpm build && pnpm preview

# Release and deploy
pnpm release:patch    # 1.0.0 → 1.0.1
pnpm release:minor    # 1.0.0 → 1.1.0
pnpm release:major    # 1.0.0 → 2.0.0
Troubleshooting
"DNS check unsuccessful" in GitHub Pages
DNS hasn't propagated yet. Wait 15–30 minutes and click Check again. Make sure your CNAME points to your-username.github.io (not the repo URL).
Site loads but shows a blank page
Check the browser console. Common causes:
- Wrong
basepath invite.config.ts(should be"/"for custom domains) - Missing SPA fallback (
404.html+index.htmlsnippet) - Build failed silently — check the Actions log
HTTPS certificate errors
Make sure SSL is enabled in ArvanCloud and "Enforce HTTPS" is on in GitHub Pages. If both are fighting over certificates, try disabling ArvanCloud SSL temporarily and let GitHub handle it first.
Old version still showing
ArvanCloud caches static assets. Purge the cache from the ArvanCloud panel (CDN → Caching → Purge), or wait for the TTL to expire (usually a few hours).
Deep links return 404
Your SPA fallback isn't set up. Add public/404.html and the path-restore snippet in index.html (see Part 1.3).
What about the cost?
| Service | Free tier limits | Enough for a personal app? |
|---|---|---|
| GitHub Pages | 1 GB storage, 100 GB bandwidth/month | Yes |
| ArvanCloud CDN | Free DNS + CDN + SSL | Yes |
| Domain | ~$10/year | One-time yearly cost |
For a personal music player or portfolio, you'll never hit these limits.
Summary
- GitHub Pages hosts your static files for free
- Buy a domain from any registrar you like
- ArvanCloud gives you free DNS, CDN, and SSL
- GitHub Actions builds and deploys on every version tag
- Total hosting cost: $0/month (plus your domain)
The full deployment README for Bitser lives in the project repository if you want copy-paste configs and environment variable details.
Happy deploying.